EZ Installer
⚠️ IMPORTANT — READ BEFORE INSTALLING
If you already have our other plugin, BlogFeeds Pro! for Sngine, installed on your platform, * DO NOT * follow the installation steps on this page. Instead, please refer to the Sync-Blogfeeds Guide 9see top menu bar) specifically provided for this instance.
The reason for this is we are adapting our plugin panel to manage our exising, and future, plugins from one location and until we have both existing plugins in sync a standard install will break one or the other. the panel will feature auto-updates, direct links to support and resources, and other features that will make your life easier in managing our plugins on your Sngine system.
THIS STEP WILL NOT BE REQUIRED IN FUTURE UPDATES
Installation is FAST and EASY with our included EZ-Installer! Just follow the outlined steps below and your PageFeeds Pro w/ SocialSync will be up and running in just a few moments.
IMPORTANT!
This method if only for new installs of this plugin. If you have previously installed this product on this system you will need to follow the directions in the UPDATE portion of this documentation.
~ ALSO ~
If you have installed ANY other plugins, or had custom work done, that effects the following files in ANY of your theme directories (default/xngine.elengine):
../public_html/YND_theme_files
- page.php
~ OR ~
_../public_html/YND_theme_files/content/themes/((theme_name))/templates/
- _user_menu.tpl
- page.tpl
then you will need to follow the MANUAL INSTALL portion of this documentation.
Make BACKUPS of the above mentioned files before you begin!!!
Upload Files To Server
-
Make sure you have downloaded the newest version PageFeeds Pro from our online store (https://shop.yubnub.digital), as well as your license key. The downlaodable plugin is located in My Account/Downloads on the store. your license key is located in My Account/License Keys
-
UNZIP the downloaded package on your local machine.
-
UNZIP the file YND_Panel-upload.zip on you local machine.
-
Open your favorite FTP CLIENT and log into your hosting.
-
UPLOAD the ENTIRE folder ../YND_Panel/ to your /((YOUR DOMAIN))/public_html/ directory.
-
UPLOAD the ENTIRE folder ../YND_theme-files/ to your /((YOUR DOMAIN))/public_html/ directory.
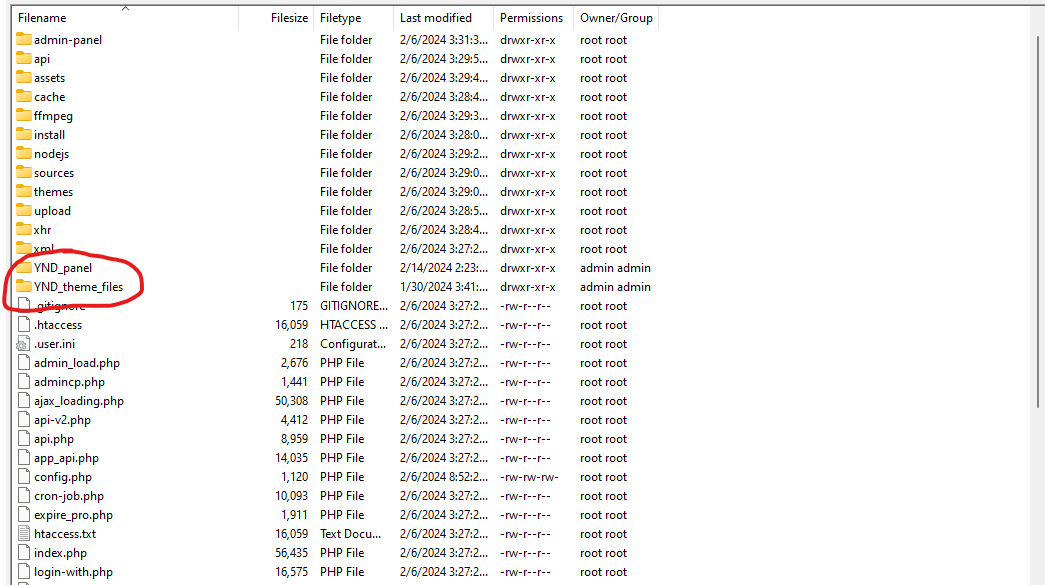
The file structure should now look like the image below :

Run EZ-Installer
IMPORTANT!!! BEFORE YOU BEGIN!!!
MAKE SURE that the directory on your serer
_((YOUR_DOMAIN))/public_html/YND_Panel /uploads/
has permissions set to (777)
IMPORTANT!!! YOU SHOULD BE LOGGED INTO YOUR SNGINE SOCIAL SITE WITH AN ADMIN LEVEL ACCOUNT BEFORE RUNNING THE INSTALLER!!!
-
Make sure you have your PageFeeds Pro Purchase Code available!!!
-
Make sure you have your Sngine database information handy!!!
-
In your browser go to https://((YOUR_DOMAIN.COM))/YND_panel/?page=install - BE SURE to replace ((YOUR_DOMAIN.COM)) with your actual domain name.
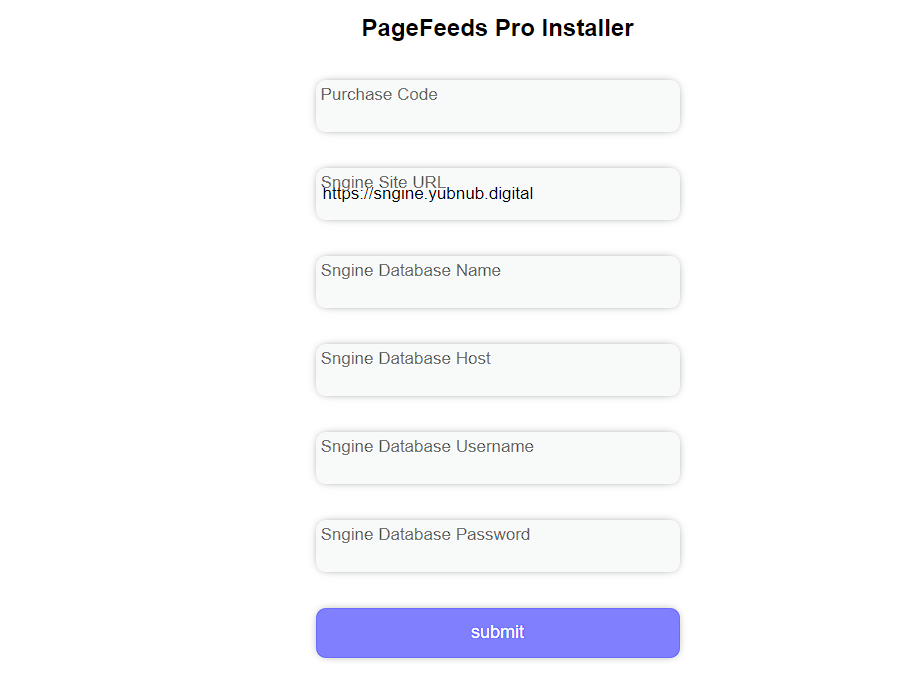
You should now see the screen displayed below in your browser :

You will now fill in all the fields with your own information as follows :
-
The Purchase Code for PageFeeds Pro you recieved from the download shop.
-
Sngine Site URL - https://((YOUR_DOMAIN.COM)) - Replace with your actual Domain.
-
Sngine Database Name - The name of the database you created when you first set up Sngine.
-
Sngine Database Host - Usually localhost, if not, consult your hosting provider.
-
Sngine Database Username - This is your DATABASE username, NOT your Sngine username.
-
Sngine Database Password - This is your DATABASE password, NOT your Sngine password.
Once you have entered all the correct information, click SUBMIT
If you have followed all directions to this point, and have not seen any error messages, the core of PageFeeds Pro w/ SocialSync has been succesfully installed on your server.
Theme Files
PageFeeds Pro comes with its required theme files for the default Sngine theme, Elengine, and Xngine. They are located in the 'YND_theme_files' folder that was created when you initially uploaded and unzipped the package. In order for PageFeeds Pro to function, these files will need to be individually copied from the folders in YND_theme-files to the theme folders of any of the 3 themes you have installed on Sngine - . the best way to do this is to use the file manager provided on your hosting.
OVERWRITE EXISTING FILES!
The files to be copied will be :
FROM :
SOURCE : ../public_html/YND_theme_files
- page.php
TO :
DESTINATION : ../public_html/
- AND -_
FROM :
Below MUST be repeated for EACH theme you are using on Sngine
SOURCE : ../public_html/YND_theme_files/content/themes/((theme_name))/templates/ or the plugin will not work!
- _user_menu.tpl
- page.tpl
- YND_js.tpl
- YND_css.tpl
TO :
DESTINATION : ../public_html/content/themes/((theme_name))/templates/
Make SURE you have repeated the last part aboce for EACH theme you are using on Sngine or the plugin will not work!
Additionaly For EACH theme you are using, go to the ../public_html/content/themes/((theme_name))/templates_compiled/ folder and delete all the files in the folder.
Clear your browser cache of all files and cookies.
- NOTE : If you are having any difficulty with copying theme files and overwriting the existing files on your server with the method mentioned above, then you will need to copy them from your PC to your server using an SFTP client such as FileZilla (free). You will need to copy each file, individually, from the download package on your workstation to the coresponding folders in your Sngine installation on the remote server.
CONGRATULATIONS! If you have followed all directions to this point, and have not seen any error messages, the core of PageFeeds Pro w/ SocialSync has been succesfully installed on your server.
You can now proceed to the CONFIGURE portion of this documentation.